[Note: This entry was written on Saturday, April 08, 2006.]
"I don't know, man," yelled the Reuse Center forklift operator as he slowly lowered the heavy pallet of dirty terra cotta roof tiles onto the back of our old pickup. "I don't want to break your struts, ya know what I mean?"
He was right. The back of the pickup was sinking so low that either the shocks were about to blow or the front end of the pickup would shoot up off the ground. "Sorry, but you're gonna have to load them by hand," the man said as he moved the pallet back to the ground.
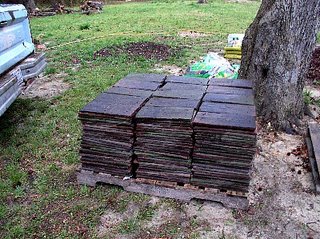
We didn't mind. Well, I should say the Rose Support Team did not express any displeasure at having to load 409 terra cotta roof tiles on the back of two vehicles in the rain. I was hoping the rain would stop by afternoon but it didn't. With or without rain, I was so pleased at getting the stack of tile within my budget of 50 bucks that I think the guys caught my excitement. The Rose Support Team formed an assembly line and in no time at all loaded almost half the tiles into the back of my van. The rest were lifted via forklift to the pickup truck.
"You know those are
roof tiles. They're not strong enough to use for a patio because they're just roof tiles," the man cautioned.
Bah.
Where seldom is hearrrrd, a discouraging worrrrd... Discouraging words won't stop me from putting in a patio! I blew the entire budget getting the plants so from now on, we're landscaping on a shoestring. I figure it this way - if the tiles break, they break. So right from the start, I'll plan my patio design to look good with broken tiles.
Woohoo! We're going to have a patio! Sweet. I never thought it would happen this year. According to my calculations, each tile covers 108.75 square inches. With four hundred nine 14.5" x 7.5" tiles and a pile of broken ones, set 1/2" apart, we can cover at least 340.84 square feet for the patio.
This morning was the first time we actually sat down together and seriously discussed ideas for the backyard. Before this morning, it was all rather vague and a patio wasn't even in the picture. After all, we're on a shoestring budget. But the Garage Garden is growing Jumanji-style; the roses are climbing, the phlox wants to creep and the petunias want to cascade. The nine miniature roses, three lavender plants, and baggies of dry echinops and poppies seem to be giving up and only utter a forlorn sigh when I enter the garage so we have to move quickly.
I decided I only want to plant each plant once. According to the gardening books, moving plants is hard work. I'm not sure I can motivate the Rose Support Team to do frequent transplants. Also, the gardening books give the impression that frequently moving plants might cause them "stress". That's a new one to me. How does a plant get stressed? This means my remaining three climbing roses just can't be plopped down anywhere lest I give them undue "stress" and they decide to not bloom for me just for spite so this morning we had no choice but to sit down and come up with a real plan. No more dreaming. No more stalling. We made a real, bona-fide, little-circles-and-squiggles-drawn-on-paper plan. We even used colored pencils.
The design we came up with for the backyard is especially attractive because it's made to grow. It's open-ended so we can add to it year to year. Sections of hedge have room to stretch. Beds are placed so they can be made smaller or bigger. Grass areas are smaller, meaning more economical to keep nice but can easily be turned into a hedge maze if we want. There's space to put a porch swing in a secluded spot at the back of the property, an above-ground pool for the kids and a spot for a pergola. The final design is one of continuity, not a haphazard look. Well, it's my personal, optimistic opinion that we are achieving continuity. Best of all, I have another year to come up with boxwood money for the Hedge Maze. Yes!
As we planned the landscaping, the most inspiring amongst our resource materials spread out over the dining room table was the
Stonescaping Idea Book by Taunton Home. A Hedge Maze is very important to my comfort but seeing rocks in the backyard is more so. Rocks are permanent. They lend a feeling of security, strength and tranquility. I enjoy their color, their texture, their shadow and even their earthy smell. They remind me of home and my dad's stone walls.
My mom doesn't think as fondly of the stone walls on their property. "All those lovely stone walls you see out there are really homes of
snakes," she tells me. "
Many snakes.
Snake hotels! Do you want snakes everywhere?"
Now I'm not sure there are actually that many snakes living in those walls. I've never seen one in all the years I've visited. But I must say I had not thought of our patio wall becoming a snake hotel. We did see one slithering, hissing brown snake in the backyard flower bed last fall. We never did see where it went as it disappeared under all the sticks and dead leaves in the garden area. The Chief of the Rose Support Team suspects it was a poisonous one. Hopefully our cats, owls and deer will keep the snakes from seeking accommodations in our snake hotel. "Sorry pal, we're all full this week. Move along to the shed next door or stay and be dinner."
The Stonescaping book doesn't mention snakes. But it does specify rocks under foot should be 2 to 3" thick. Maybe that's so a snake will be less likely to live under it. The terra cotta roof tiles we got are only 5/8" thick. So we're taking a risk in using them for a patio. I'm going to search the internet for info about using terra cotta roof tiles for a patio. Surely, someone, somewhere, has tried it.
I'm rather fond of the ideas in the Stonescaping book that suggest placing the stones 3 or 4" apart and planting thyme or blue star creeper in between. I think a mixture of spongy moss and thyme between terra cotta tiles would make a lovely surface for the patio. The extra inches between the tiles will give us even more coverage too. Hopefully, the roots of plants won't lift the thin tiles. I'll just have to make sure the kids jump on each tile every day to keep the tiles down and the snakes out. Or maybe we'll take advantage of the two nail holes in each tile and nail them to the ground. That oughta work.
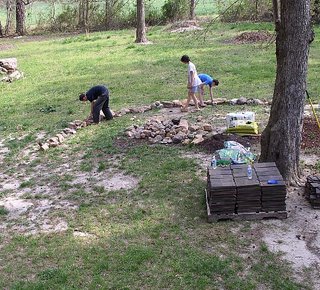
Curving around the back side of the patio is where we're putting the stone wall. It won't be very high, just high enough to hold the raised bed behind it. Our property offers nary a rock so we'll have to get them somewhere else. The Reuse Center sells rocks exactly like the thousands on my parent's property for $2.00 a piece! Imagine that! That means a stone maze will cost a zillion more than a boxwood hedge maze. Rats. But that also means my mom's snake hotels are worth thousands of dollars! I'll have to tell her. Maybe that will cheer her.
To save money, we'll start the wall by rearranging some of the rocks already on our property, such as taking some from the rock borders around the front flower beds. Adding to the rock wall is going to be a lifetime hunt. "Hi dear. How was your day at work? Did you bring home any rocks today?"
Now that we have a plan, I can focus. I'm focusing on the patio area so we can put the stone wall around the edge of the patio and put in the raised bed behind the stone wall around the patio so we can plant the climbing roses and languishing lavender in the raised bed behind the stone wall 'round the patio. Then we'll be set to have a picnic, jump on the tiles and make sure the snakes don't move in.
Like a bunch of dominoes, gardening is. You can't do one thing till you do a dozen others. No, make that 409 others. Stacked. Without any snakes in between.
 The other day I saw a spider on the Septre'd Isle on the deck. Of course I left her alone because spiders will keep harmful bugs off my roses, right? By eating them, right?


